Tamiya's Sd.Kfz. 250/9 Redux
- Mido
- May 23, 2022
- 6 min read
Sometimes the igluemodels headquarters has to double as a professional-employee-remote-working-headquarters. Nauseous? I am. But the worst part is not the corporate-induced nausea. There are drugs for that. The worst part is that the igluemodels airbrush spray booth must be tucked away for another day.
Sigh.
I could let this situation keep me down. Or I could also use it is an opportunity to continue practicing my brush painting and weathering skills. So Sd.Kfz. 250/9, are you ready for your refurbish?
The vehicle
In 1939, the German army realized that infantry units needed a lightly armored troop carrier, or leichter Schützenpanzerwagen, to keep pace with panzer units. To fulfill this need, the Deutsche Maschinenfabrik AG (Demag) was called upon to design the special motor vehicle, or Sonderkraftfahrzeug (Sd.Kfz.), 250.

Demag was a natural choice because they already had a small half-track, the Sd.Kfz. 10 in service with the German army. To create the '250, Demag modified the '10 by reducing its length by one road wheel. A separate company, Büssing-NAG, was contracted to manufacture the armored hull.

The '250 featured two steerable wheels in front and a set of overlapping and interleaved "Schachtellaufwerk" tracked wheels were mounted in the rear. This was a pattern of running gear found on nearly all German half-tracks. Wide turns could be accomplished by moving the front wheels, but sharper turns required braking pressure on either the left or right tracks. Propulsion for the '250 was supplied by a 100 horsepower Maybach 6-cylinder gasoline engine and top speeds approached 50mph. It was a formidable vehicle and could maneuver cross-country favorably.

The '250 was a versatile vehicle and it was used for reconnaissance, command and control, and auxiliary roles. In all 14 major variants, numbering approximately 6,500 units were documented and production ran until 1945.

Like many German machines, the '250 series was overengineered, and as the Second World War raged on, design simplifications were introduced. Visually, the largest difference can be seen from the reduction in the number of hull plates (19 to 9) which caused the vehicle to take on a flatter side-aspect appearance.

The '250/9 variant that I have on the bench was intended for reconnaissance and it is believed that the first examples went to the Eastern Front in 1943. The vehicle sported a 2 cm kwK 38 gun which was similar to the main armament found on Panzer IIs and was housed in a turret shared by the Sd.Kfz. 222 light armored car.
The kit and build
As we know, Tamiya has made a lot of 1/35 scale armor kits. And they have been doing it for a while. According to Scalemates.com, the Sd.Kfz. 250/9 that I will be repainting was first issued in 1980 which was their second version of an Sd.Kfz. Their first was a particular 250/03 hull: General Erwin Rommel's Afrika Korp command vehicle named GREIF. Pretty cool!

Because I built this kit roughly 20 years ago, I won't be able to write anything in the way of building. Instead, I will offer my observations on the kit's features.
Limited interior and some molded on exterior details
Engine, transmission, and suspension for front wheels
Robust-looking main gun
Link and length tracks
Mesh for the turret netting
Several unit marking decals
Included crew member
At the time of writing, the kit looks out of production. But it does not appear particularly difficult to get. I have seen units floating around at local hobby shops and posted on eBay. If you can get it for a reasonable price, I would recommend you give it a try!
Painting
A while ago, I practiced brush painting a Kettenkraftrad, and at that time, I also primed the '250 black in anticipation of a second refurbish project. I decided to use Vallejo's Middlestone (70.882) as the base color for the '250. It is one of the colors often cited online that can be used for dunkelgelb, and I wanted to compare it to Vallejo's German Yellow (70.806) that I used on the Ketty, another often cited dunkelgelb color.
The thing about brush painting is that you have to be patient. You need to slowly build up the layers. In fact, there is a mantra: Multiple thin layers! And you can't get dissuaded after the first layer looks terrible. It always does. See for yourself!
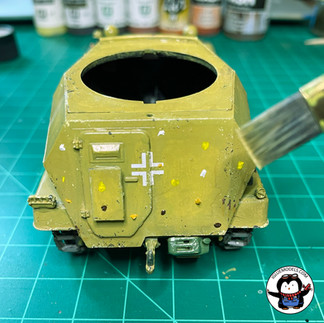
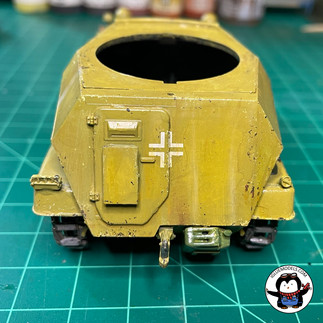
I like to try something new for each of my model builds and refurbishment projects provide an excellent canvas to push the envelope. It occurred to me that if panel line pre-shading can be done with an airbrush, why not a standard paint brush? To test this hypothesis I proceeded to highlight the centers of panels (base mixed with Pale Sand 70.837), followed by shading panel lines (base mixed with German Camo. Black Brown 70.822), and lastly, further highlighting the very center of some panels. Notably, for the last step, I used Vallejo's Glaze Medium (70.596).
Glazing is a technique that I had zero experience with. From what I understand, adding glaze medium will increase the translucency of the paint. It adds more paint medium, without adding more pigments. So while a thinner will thin paint consistency, glazes will thin the color opacity. I knew that people use it for transitioning between different colors, and I thought this same principal would be useful for smoothing out transitions in my pre-shading and for painting subsequent layers of the base color. In some ways, I amended the mantra to read: Multiple thin translucent layers!
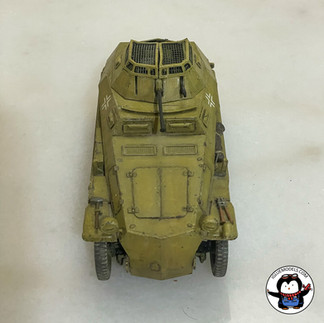
And so after a few glaze coats of Middlestone, I ended up with a relatively cool looking paint job. It's not perfect but I think the glazing idea has merit. It is something I will likely explore on future hand painted builds.
Weathering
Since this is a refurbishment project, I figured it would be somewhat "on theme" to add a fair bit of weathering and I wanted to pay attention to the order in which the weathering techniques were applied. For example, it wouldn't make sense to make something dusty, and then add rust. But it would make sense to make something rusty and then add dust.
I started by adding chipping effects using the sponge technique. For variation, two different colors and two different sponge surfaces were used. Intuitively, larger and deeper chips will be darker than the base color, and smaller topical chips will be lighter than the base color. Put differently, deep chips might go down to the vehicle's bare metal while light chips may only remove accumulated grime or the outermost paint layers. To this end, I used the sponge's scrubbing side with the darker color and the smooth sponge side with the lighter color.
Next I added minor rust effects to some of the areas with deeper chipping marks. I have learned that rusting effects are easy to overdo. Just remember that a little goes a long way and that you can always add more.
Once the rust effects were on, I added a layer of gloss varnish (unfortunately I can't remember if I used Pledge or Vallejo's Gloss Varnish). The varnish will protect all the acrylic paint work in anticipation of the oil dot filter and oil pin washes that are to follow.
First up was the oil dot filter. I used a few shades of paint that I thought would add subtle variation to the model's surface. No blues, reds, or greens this time!
I followed the oil dot filter with an oil pin wash. Be careful of the order of these techniques because they both rely on mineral spirits. If you aren't careful, applying one technique can ruin the previous one unless another barrier of acrylic varnish is added between the two. I didn't want to bother with another varnish layer, and wagered that the targeted nature of a pin wash would leave the wide area filter mostly unscathed. Fortunately, I was right in this instance.
The final stage of weathering was reserved for pigments. I have used them a few times, but I still feel like they are a mystery. One application technique that I have seen and had reservations about uses Vallejo's Airbrush Thinner (71.161) as an application medium. I always reasoned that the thinner would eat away at an acrylic varnish, which if you are using Vallejo's paints is probably the type of varnish on your model. As an experiment I wet a brush with the thinner and then stippled it a few times on the bottom of the hull. Sure enough, the paint was eaten away down to the black primer. Not good, Mido!
I left the thinner aside and proceeded to stipple on the pigments dry. I used a bit of water to wipe away excess, but usually a few wipes of the dry brush was enough. I used a water-based pigment slurry for the wheels. I considered using Vallejo's Airbrush Flow Improver (71.262) as a way of breaking the water's surface tension to achieve a more natural look, but ultimately it wasn't needed.
Final thoughts
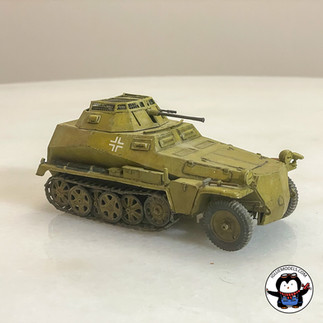
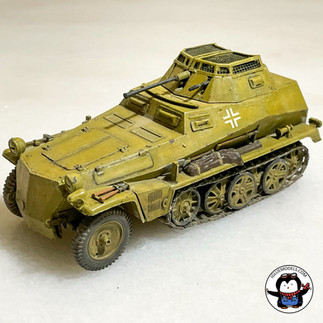
And there you have it! A fun little project filled with low-pressure experimentation and an easy way to keep the bench going. I enjoyed trying the glaze pre-shading technique and will be more deliberate when applying shadow layers in the future. I would be remiss if I didn't mention the Middlestone color. Personally, I think it is a little too dark for dunkelgelb but then again, under wartime conditions, there really wasn't a singular dunkelgelb. The oil dot filter was effective, and I liked the look I got after applying the pin wash. There is definitely more to learn about using oils and this project has me encouraged to try more. As for the pigments, the kindest thing I can say is that they are messy. Let me leave it at that!
Thanks for reading,
Mido
Contact the author: mido@igluemodels.com or on IG and Twitter @igluemodels
Sources, information, and other useful links




















コメント