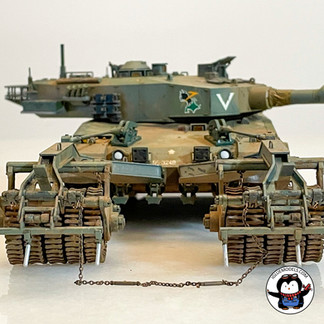
JGSDF Type 90 Tank w/ Mine Roller
- Mido
- Jul 31, 2021
- 8 min read
Updated: Jul 8, 2023
Before we dive into the subject, it is necessary that I first address a malady that can befall any modeler: Neverending Kit Syndrome ("NKS"). This technical term, coined by yours truly, is defined as:
1) A model kit that has been started and stopped numerous times over a period longer than a modeler cares to admit and may lead to guilt, diminished self-worth, and/or fits of rage. 2) Of or paralleling insanity, where the same action is taken (starting the kit) while expecting a different result (finishing the kit).
Why the digression? Well, this kit has given me NKS for the last 10+ years. But enough of that, you're here to read about the tank, kit, and build!

Editor's note: Choose your own content! Either continue reading for the tank's background or click here to be taken to the kit and build.
The JGSDF
To understand the Type 90 tank, it is necessary that we go back to the Japanese Instrument of Surrender on the deck of the USS Missouri (BB-63) in 1945. This document set forth the dismantling of Japan's imperial armed forces as called for in Potsdam Declaration and by the associated directives of General Douglas MacArthur, the Supreme Commander of the Allied Powers. Then, during the construction of the Japanese Constitution in 1946, Article 9 is introduced which effectively renounces war as a means of settling international disputes, and that an armed forces will not be maintained. It was not until 1954, after a series of expansionary defense legislation, that the Self Defense Forces Act authorized the creation of the Japan Ground Self-Defense Force (JGSDF).

Two reasons for this backdrop. First, any weapon system needs to be understood in the context of the forces operating it. In this case, the forces of Japan are for self defense. As we examine the characteristics of the tank, we should see a design consistent with this principal objective. Second, on a personal level, I am always surprised by the series of antecedent events that led to an outcome. I never imagined that in some sense, the USS Missouri, would share a place in the timeline that led to the development of the Type 90.
The Tank
The Type 90 was born out of a design requirement issued in the mid-1970s for an indigenously built tank that was capable of defeating the Soviet T-72, the principal threat of the time. To meet this threat, engineers needed to solve a complex optimization problem whereby the competing demands of armament, armor, and maneuverability are carefully balanced under the constraints of cost, weight, and often times politics.

The self-defense mission of the JGSDF mandated by Article 9 means that the primary operating theater for the Type 90 is the Japanese mainland. Sort-of. Japan is a mountainous archipelago and is comprised of nearly 7,000 islands. To be sure, this is difficult terrain for a tank. Therefore, the Type 90 is primarily stationed on Japan's second largest island, Hokkaido, as part of the 7th Armored Division of the Northern Army.

Yet even with this choice of deployment, only 65% of the island’s bridges are crossable by the Type 90 and there is trouble utilizing existing infrastructure for transport. Why? Because the Type 90, weighing in at 50-tons, is heavy for a Japanese tank. In fact it is a full 12-tons heavier than the Type 74 tank that it replaces. While 50 tons may not be heavy when compared to western tanks such as the American Abrams or German Leopard 2, the Type 90 was so heavy that Japan's follow-on tank, the Type 10 will weigh only 44 tons.

Unquestionably, the biggest driver of weight on a tank is armor. For its time, the Type 90 featured advanced composite armor. Composite armor generally consists of various metal alloys sandwiched between layers of ceramics and other materials. The exact compositions and arrangements are classified. Regardless, ceramic armor provides two key benefits over traditional steel armor: it is stronger and lighter. And if you are wondering why some modern tank designs look boxy and similar, well that’s the composite armor!
While armor goes a long way towards protection, so do tactics. This is where the Type 90 features a neat design element that is particularly suited for Japan's mountainous terrain. Four hydropneumatic actuators are embedded in the suspension and can depress the front and/or rear end of the tank. Doing so allows the tank to simultaneously reduce its targetable silhouette and expand its elevation engagement envelope.

Another interesting feature of the Type 90 is its autoloader. From a design perspective, a choice needs to be made between a human loader, or an automated loading system. Both have pros and cons. A well-trained human loader can load the main gun just as efficiently as an autoloader and can also easily swap out different projectiles as the fluid pace of combat unfolds (different targets receive different ammunition). Additionally, having an extra crew member can reduce task saturation, enhance situational awareness, and help with general maintenance. However, this extra body requires a larger crew compartment to be protected and that means added weight which is to say nothing about additional long-run personnel costs. While I am not sure of the definitive reason, I can only surmise that the efficiencies in crew size and considerations for weight savings eclipsed the benefits that a fourth crew member would have brought.
Autoloader or crew, the reason for inclusion is to reload the gun. A gun and its ammunition are a notoriously difficult set of systems to develop. Initially Japanese industry was called upon to fully develop this weapon system. However, after considerable effort, money and time, the Type 90 would ultimately be outfitted with a variant of Rheinmetall's L/44 120mm smoothbore gun.

Notably, this is the same gun that can be found mounted on Germany's Leopard 2, America's Abrams, South Korea's K1, and Italy's Ariete tanks. In a favorable twist, the gun is produced under license by Japan Steel Works Limited which is somewhat consistent with the politically-motivated Type 90 indigenous program requirements.

Overall, the Type 90 has a reputation for being a good tank, but it is showing its age. Having been first produced in 1990, it is now apparent that there are limitations in battlefield command, control, communication, and computing. Modernization efforts have been deemed too expansive and as a result, much needed program funding has been diverted to Japan's next main battle tank, the Type 10. I have not been able to determine exactly when the Type 90 will be pulled from service, but when it finally is, it is most likely go quietly and without having fired a shot in anger.
The Mine Roller
Tanks have always been susceptible to mines. There are many ways to defeat mines, but one effective way is to simply run them over with something before the highly valued tank and its crew do. Enter the Type 92 mine roller.

The Type 92 mine roller consists of two detachable arms that suspend 5 steel disks each. These steel disks feature ribbed projections that are meant to create a ground pressure higher than the carrier tank. Therefore, when a contact mine is encountered, the mine should safely detonate under the roller and not the tank's tracks. Magnetic mines are detonated by a magnetic force emitted by attachments in front of the rollers. All told, each arm weighs 12-tons.
The kit
Tanks are a common subject for modelers. Uncommon are tanks with a mine roller attached! According to scalemates.com, Tamiya first began releasing Type 90s in 1996 and it was not until 1999 that they packaged both the Type 90 tank and Type 92 mine roller together. Over the years, there have been several subsequent releases of the Type 90 tank and if the mine roller wasn't your thing, then maybe the release with ammo loading troops or a utility jeep is. Tamiya is certainly spoiling us with choice!
The build
Three letters: NKS. That's right, I honestly can't believe how long this kit has taken me to complete and I can't begin to recall how many times it has been started. Heck, long-time readers will notice the welcome message to this site featured some of this kit's sub assemblies!
So what do I remember about this build?
Well, I know that the top of the hull was warped, and no, I don't think it was Tamiya's fault. I think that's what NKS and improper kit storage got me, and what copious amounts of glue was able to fix.
I also know that the rubber band style tracks had become a little brittle and one broke on me when it came time to attach it. Luckily the tank features side skirts which disappears this inconvenient truth.
The barrel had an unsightly seam that I discovered in 2021 which made me question the competence of the original builder. Wait that was me, right? Ehh, can't recall!
But most of all I remember the mine roller assembly. Uggh, the chains! That, loyal readers and fellow modelers, was nightmare fuel. Below are a few photos of the assembly. What’s important to understand is that each chain had to be tied to the roller and arms by metal wire. In fact, the model's rollers are literally suspended from the attachment arms by the chains just like the real-deal. Supercool! But the limited amount of metal wire supplied as the means to attach everything and the ensuing 1/35 scale knot tying exercise was meltdown-worthy. Suffice to say, Age of Sail modelers have my utmost respect.
Primary painting and decals
Painting the tank was supposed to be a relatively straight forward affair. First I laid down a base of Tamiya’s NATO Black followed by white pre-highlights on all the panels. Then, due to some paint shortages of Tamiya’s existing JGSDF colors (XF-72 through XF-74), I proceeded to mix up a set of custom green and brown colors for the camouflage.
And now the fatal set of mistakes so pay attention!
I painted the entire model with a base green color.
A camouflage pattern was created by Silly Putty.
Brown splotches were then added.
Fatal mistake? Yep, that double layer of paint where the brown splotches were applied meant that most of the hard work pre-highlighting was gone. To even things out, I went back over the single-layer green base areas with more paint.
The kit comes with several different sets of unit-markings and ultimately I chose the decals that maximized additional color. Therefore, the tank I ended up modeling is from the Hokkaido 7th Division, 71st Tank Regiment, 5th Company.

Weathering
Factory finish, rusting in the field, what would be right for this subject? As I thought about it, it became clear that this subject was going to fall somewhere in between.
Tanks get dirty, that's a fact.
Tank's with a mine roller are probably operating on unimproved terrain.
The Type 90 has not engaged in combat.
I combined these three views and decided I would like to add some scratches, employ the standard pin wash, try out an oil dot filter, and round it all out with pigments for a dusty look.
Scratches were created by using a fine brush and several colors from Vallejo's Model Color line. Paint is applied as overlapping layers from dark to light. Some people might be inclined to add rust from "deeper" scratches, but I reasoned that the machines of the JGSDF would be well-maintained due to a lack of combat operations.
The pin wash was used to add depth to all of the panel lines and rivets on the tank. It is generally an easy process, but it can be time consuming. A few pin washing sessions were required due to all the components in this kit.
The oil dot filter came next. I have never tried this technique before, and it is worthy of a self-contained write-up. In this technique, small dots of various oil paint colors are added to the model, allowed to set up, and then wiped away with a broad flat brush and mineral spirits. The resulting subtle streaks and color gradients add visual interest to the subject.
Lastly, a slurry of pigments in mineral spirits were applied to the model's lower hull and mine roller, and splattered on to the upper hull and turret. Once the pigments were dry, a brush was used to wipe away the excess.
And with a final build time of 10+ years, I am going to call it a wrap!
Final thoughts
Upon lengthy reflection, it occurred to me that I have been intimidated by the very source of intrigue this kit has to offer: the mine roller! It is such an intricate piece of modeling. My hat is off to the Tamiya engineers who engineered it in plastic.
To be sure, even with my NKS, this kit was a long build. As I progress in my modeling journey, I find myself incorporating more and more finishing techniques. For this build, the oil dot filter was a first, and scratches and pigments were applied for only the second time. The days of gluing a kit together, slapping some paint on it, and calling it a done-deal are long over.
Thanks for reading,
Mido
Contact the author: mido@igluemodels.com or on IG @igluemodels


Comments